Introduction
The cloud is perfect for hosting static websites that only include; HTML, CSS, Bootstrap, and JavaScript files that require no server-side processing.
 In this guide, our key intention will be:
- Hosting a Static website on s3.
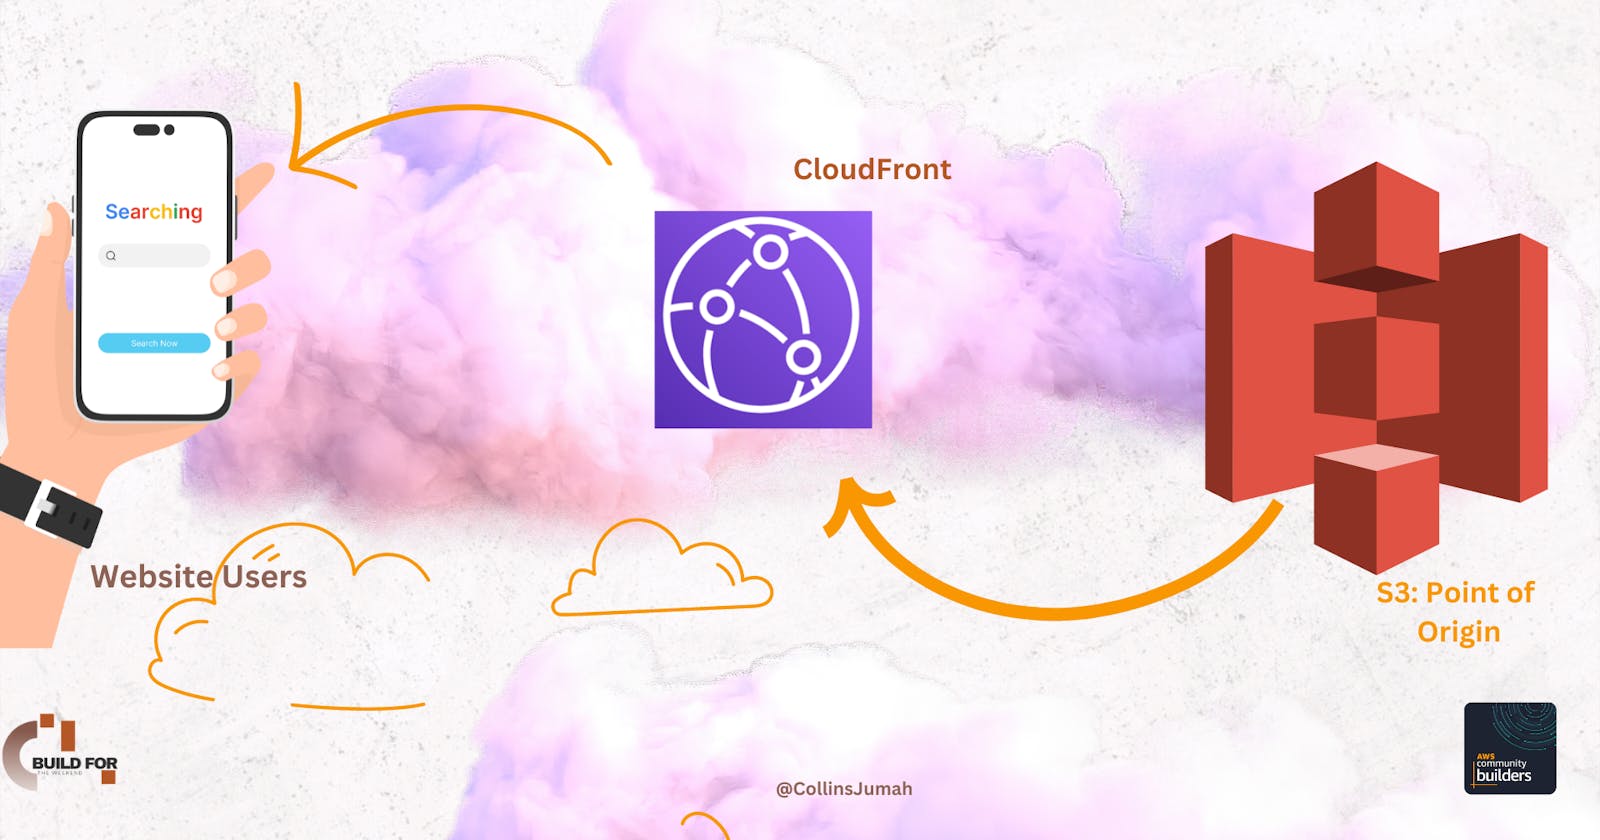
- Accessing the Cached website using the AWS CloudFront Content Delivery Network (CDN) service. Key pointers to note here are; CloudFront offers low latency and high transfer speed during website rendering.
For us to achieve the above objectives, the following steps will be performed:
Creating a public S3 bucket and uploading the website files to the bucket.
Configure the bucket for website hosting and secure using IAM policies.
Speed up content delivery using AWS Content Distribution Network service, CloudFront.
Access the website on the browser using the unique CloudFront endpoint generated.
NB: Always note that Static website hosting essentially requires a public bucket, whereas CloudFront can work with public and private buckets.
Pre-requisites:
- AWS Account. Create one here.
- Sample Static website files and folders.
Creating S3 bucket.
Amazon S3 is an Object storage service that stores data as objects within buckets. An object is a file and any metadata that describes the file. A bucket is a container for objects.
To create S3 bucket navigate to the search on your AWS Management console:

Navigate to s3 dashboard and click "create bucket"

Creating a Bucket:
In the General configurations, enter the bucket name and choose a region of your choice. Please note that a s3 is global service however buckets created is region specific. Objects in a bucket can be replicated in different AZs for high durability
Bucket names much be globally unique: Please see rules of naming a bucket.
In the Bucket settings for Block Public Access section, uncheck the “Block all public access”. This will enable public access to the bucket objects via the S3 object URL.
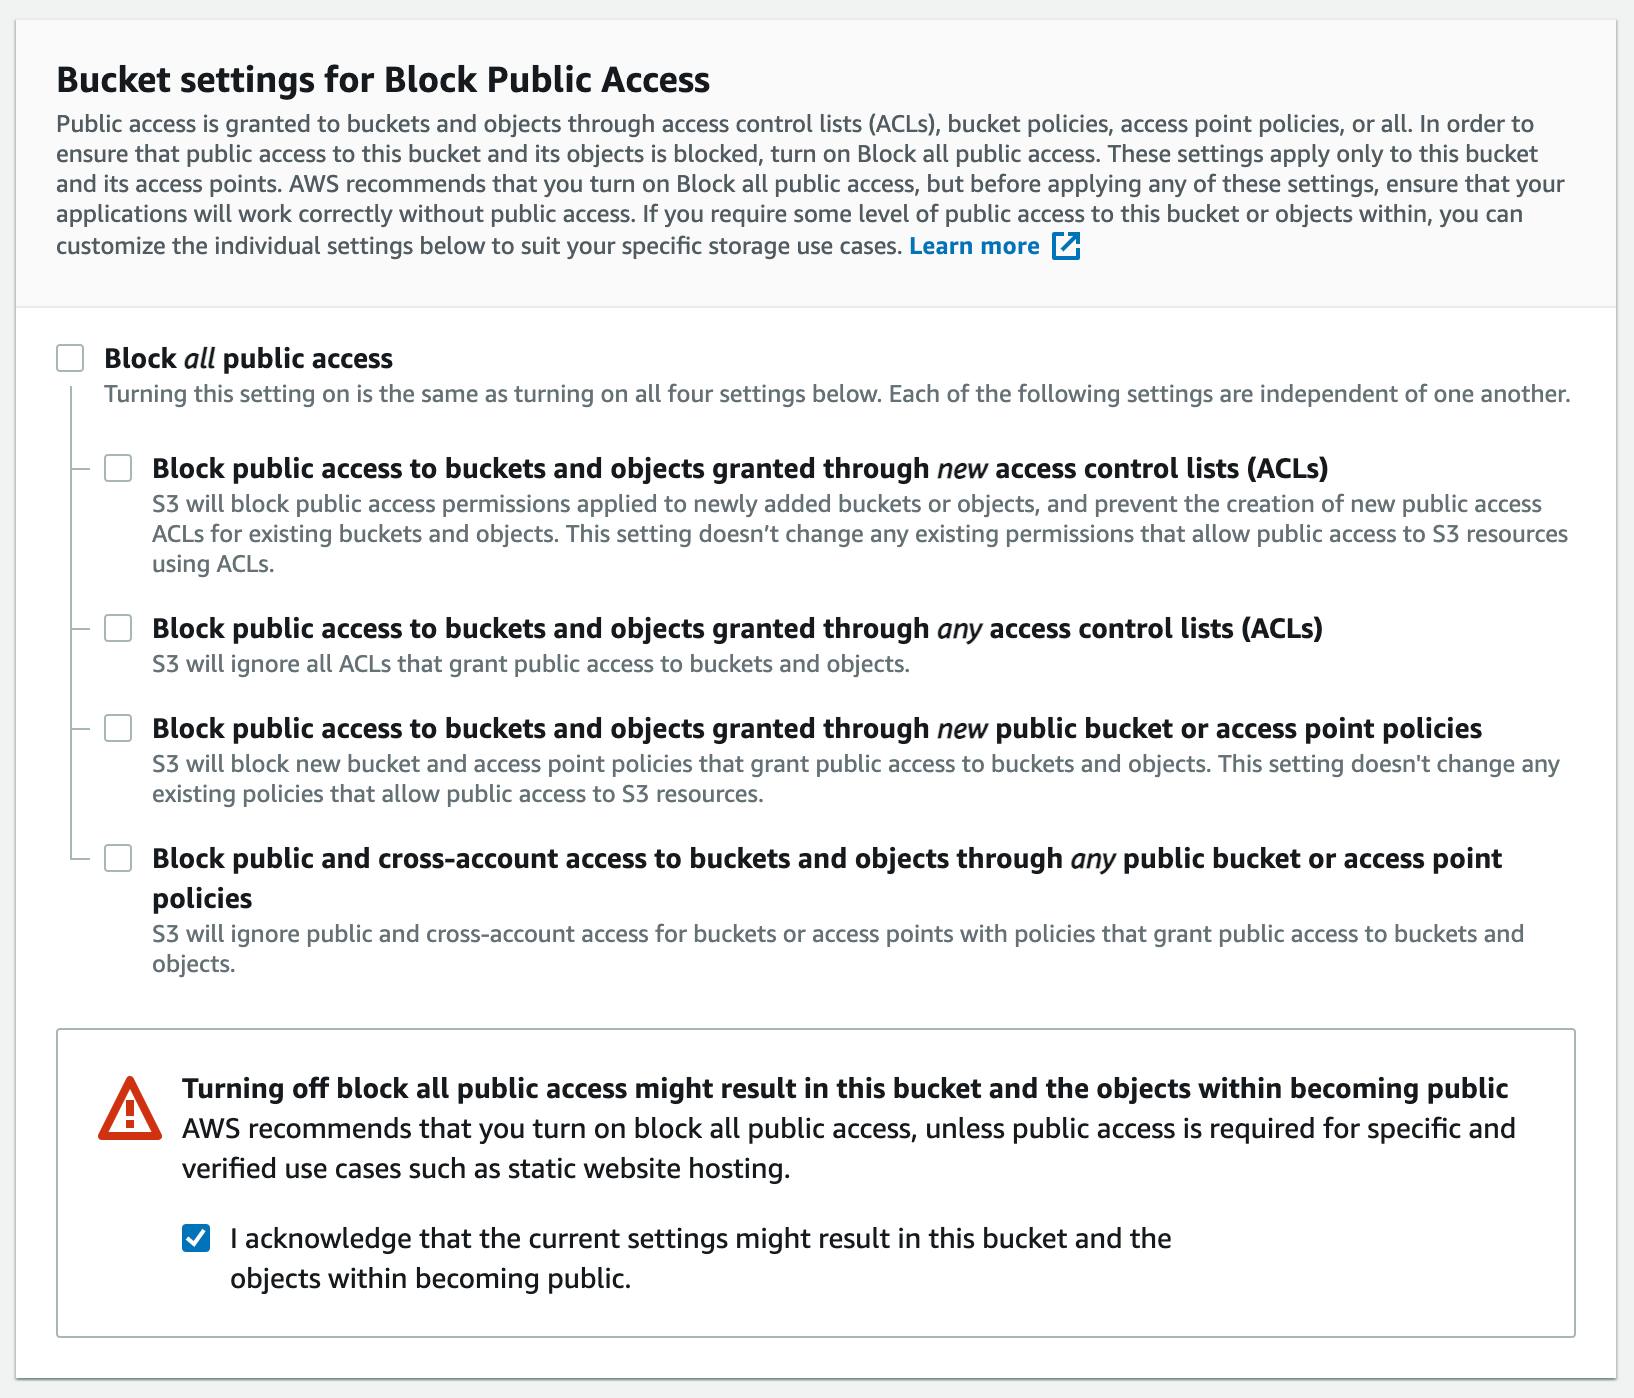
Note - We are allowing the public access to the bucket contents because we are going to host a static website in this bucket. Hosting requires the content should be publicly readable.
Once done click create bucket: Once the bucket is created, click on the name of the bucket to open the bucket to the contents.
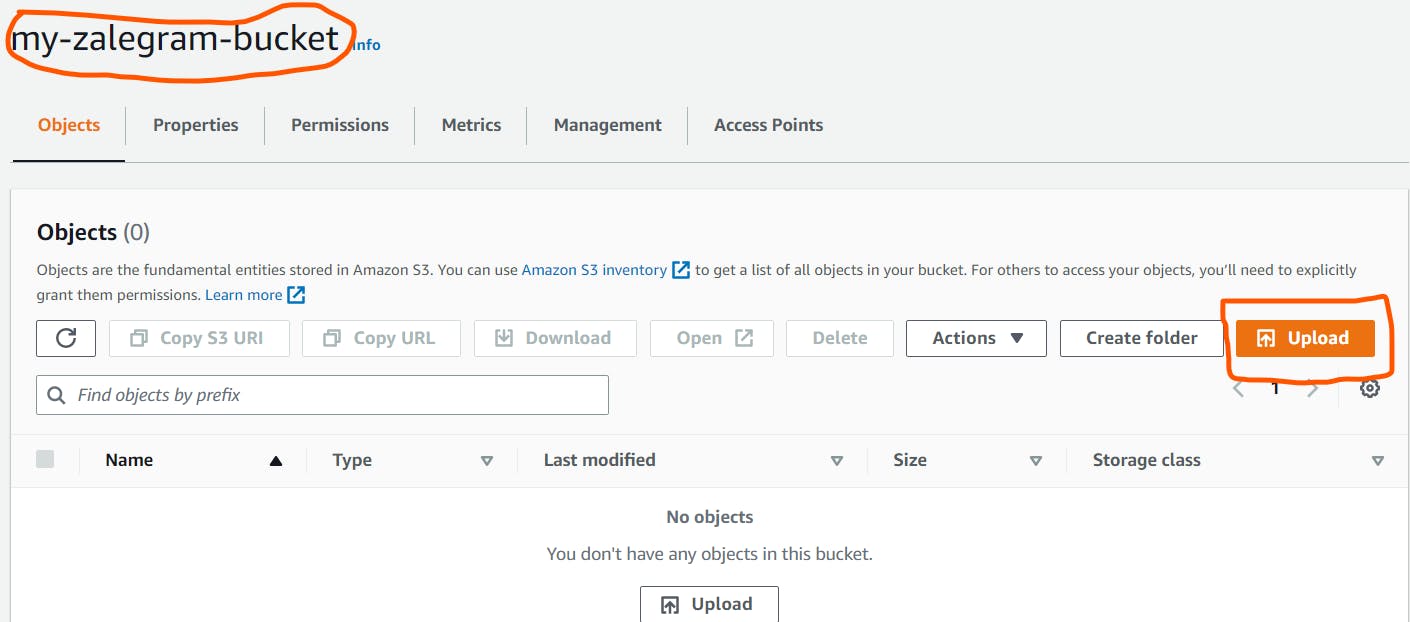
- In the next step we shall go through how to upload files in our newly created bucket.
Uploading files to S3
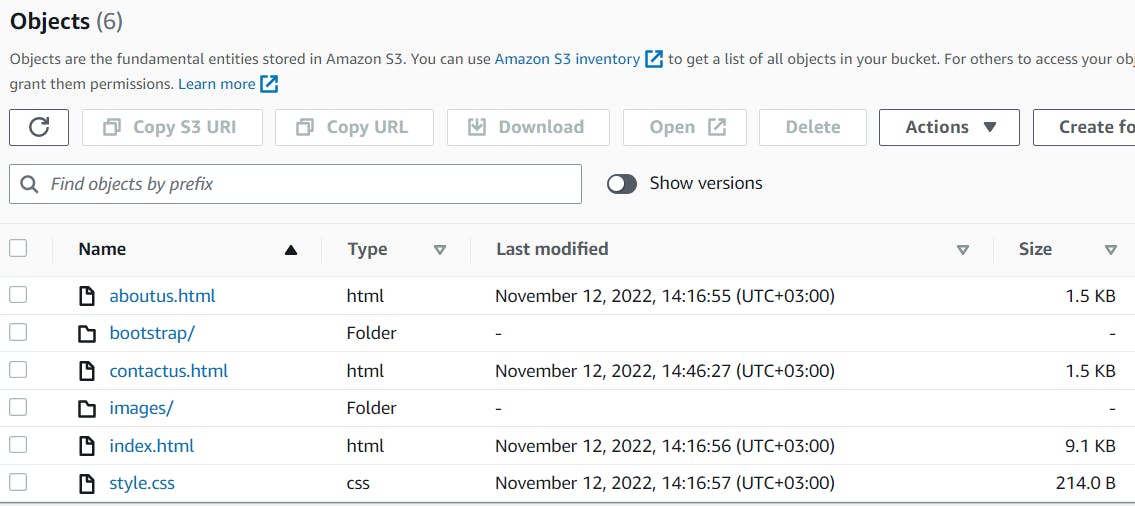
Using AWS Management Console
Earlier, we mentioned that an object is a file and any metadata that describes the file and a bucket is a container for these objects.
- To upload files first: Click upload as shown on the screenshot above.
- Select either file or folder depending with your application composition.
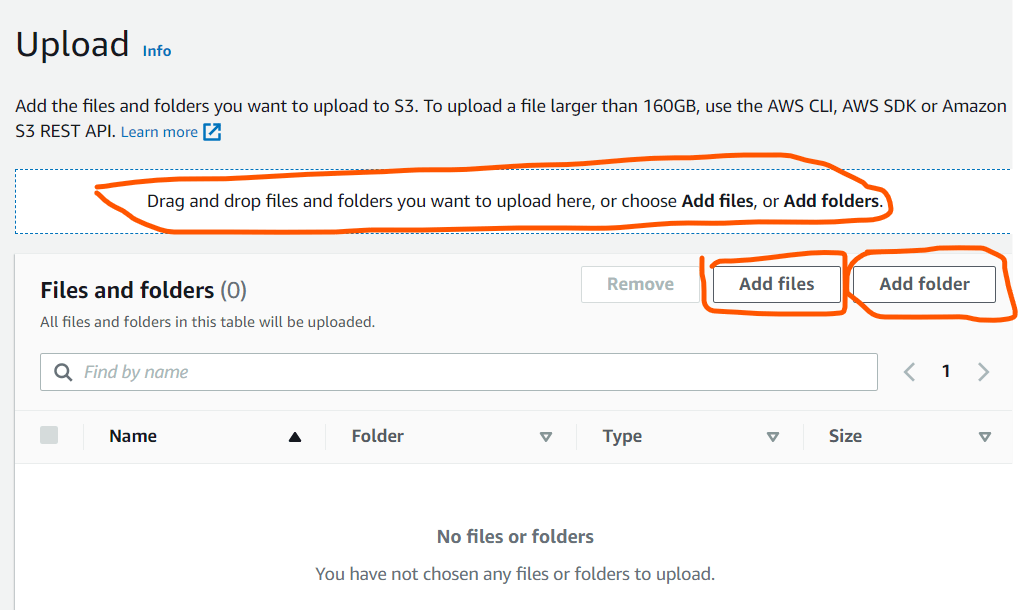
- Only upload the content of your project. These includes the project files and folders.
Using AWS CLI
Should you encounter problem uploading using Management console, here are quick step to use AWS Command Line Interface:
AWS CLI is a tool that enables you to interact with AWS services using commands in your command-line shell. You get direct access to the public API s of AWS service.
Configure your AWS CLI by running the commands:
aws configure list
aws configure
aws configure set aws_session_token "<TOKEN>" --profile default
- Upload files and folder
# Create a PUBLIC bucket in the S3, and verify locally as
aws s3api list-buckets
# In your local machine, navigate to the project folder:
cd your-website-folder
# Assuming the bucket name is my-bucket-name and your PWD is the "zalegram-website" folder
# uploading a single file.
aws s3api put-object --bucket my-bucket-name --key index.html --body index.html
# Copying over folders from local to S3
aws s3 cp bootstrap/ s3://my-bucket-name/bootstrap/ --recursive
aws s3 cp images/ s3://my-bucket-name/images/ --recursive
Secure buckets using IAM
By default, all Amazon s3 resources- buckets, objects and related sub-resources are private. Only the resource owner, the AWS account that created it, can access the resource. Additionally, the resource owner can optionally grant access permissions to others by writing an access policy.
- A policy are JSON document that explicitly list permissions within AWS.
In this step, we will right a policy to make our bucket publicly accessible.
- Click on the “Permissions” tab.
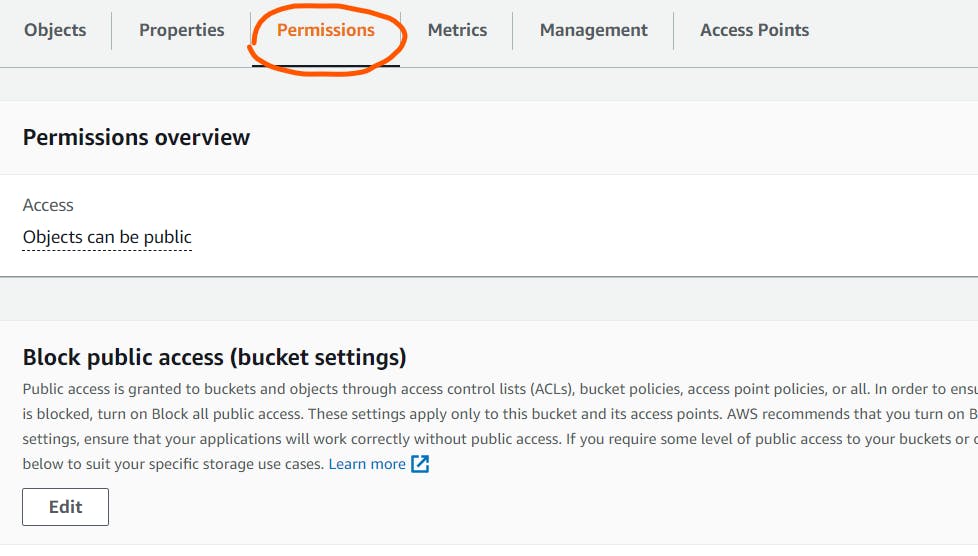
- Scroll down to bucket policy and click edit policy.
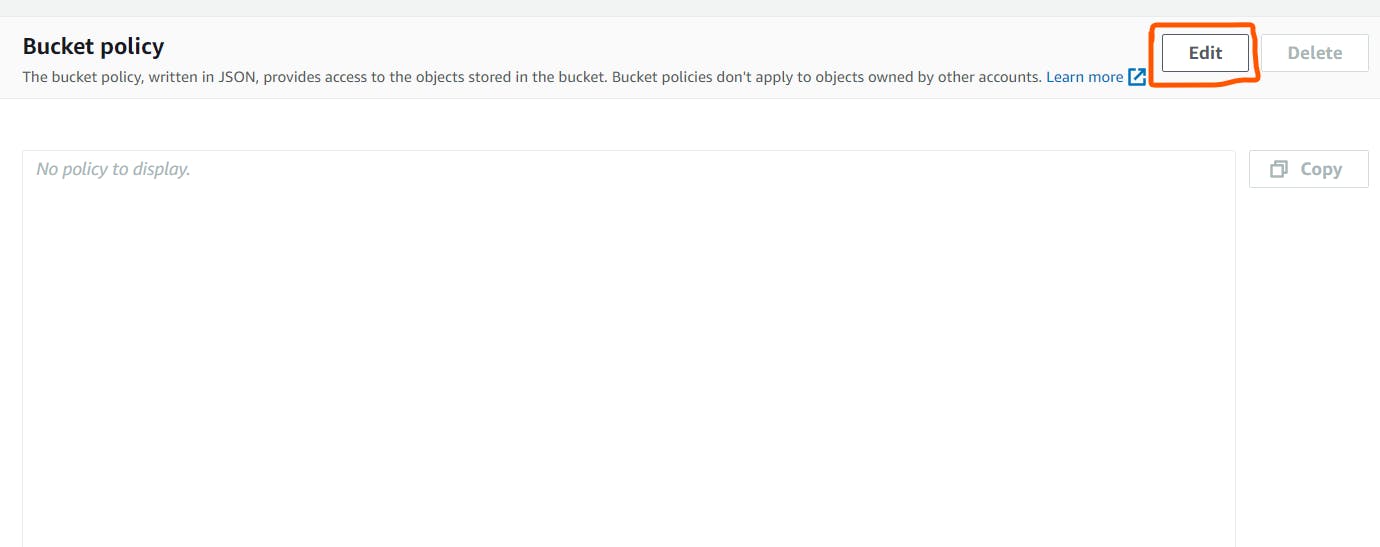
Enter the following bucket policy replacing your-website with the name of your bucket and click “Save”:
{
"Version":"2012-10-17",
"Statement":[
 {
   "Sid":"AddPerm",
   "Effect":"Allow",
   "Principal": "*",
   "Action":["s3:GetObject"],
   "Resource":["arn:aws:s3:::your-website-name/*"]
 }
]
}
NB: You will see warnings about publicizing your bucket, but this step is required for static website hosting.
Configure S3 bucket to enable Website hosting
When you configure a bucket as a static website, you must enable static website hosting, configure an index document, and set permissions. Let's dive in:
- In the selected bucket, choose properties
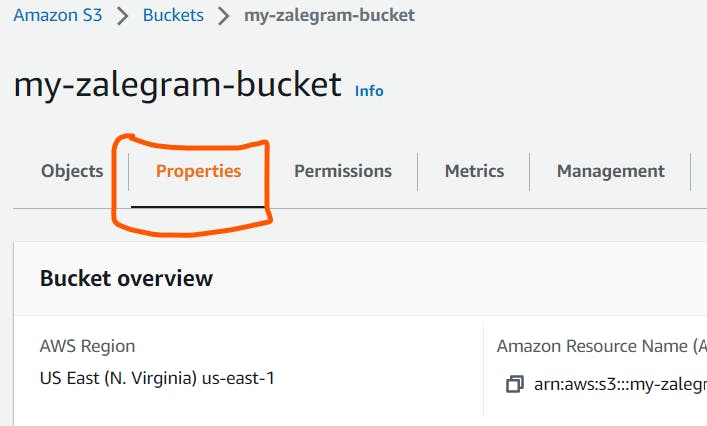
Scroll down to Website hosting and click edit

Under Static website hosting, choose Enable. In the Index document, enter the file name of the index document, typically index.html. Amazon S3 returns this index document when requests are made to the root domain or any of the subfolders.
- Error page: If you don't specify a custom error document and an error occurs, Amazon S3 returns a default HTML error document.
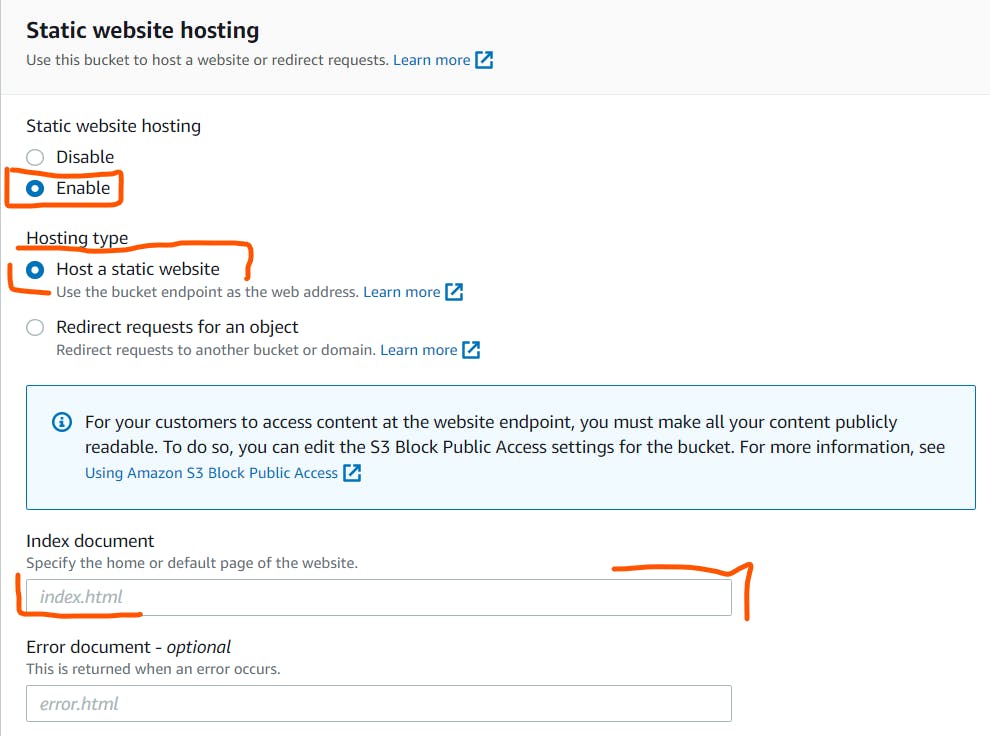
- Save changes and see the website endpoint as shown below:
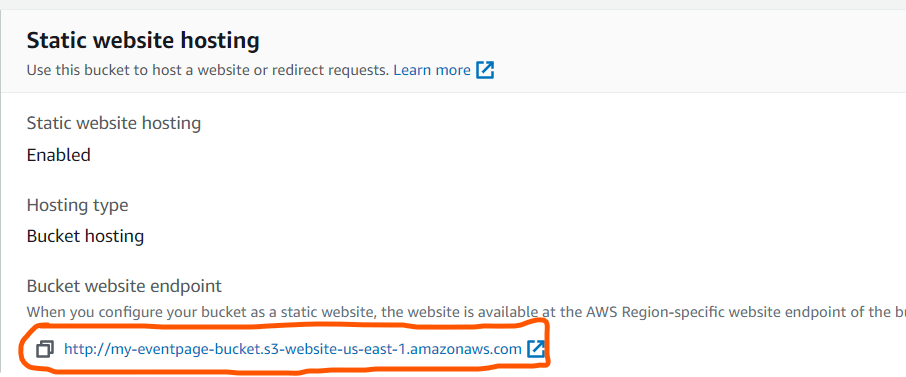
NB: Copy the endpoint for use in the next step.
Distribute your Website via CloudFront
How do we ensure our website is accessible to the user with low latency and high transfer speed during website rendering? Well, Amazon CloudFront speeds up the distribution of your static and dynamic web content, such as .html, .css, .js, and image files, to your users.
- With CloudFront caching, more objects are served from CloudFront edge locations closer to your users.
- This reduces the load on your origin server and reduces latency.
- On your Management console services, search CloudFront as shown.

- From the CloudFront dashboard, click on the create distribution

- Configure the CloudFront:
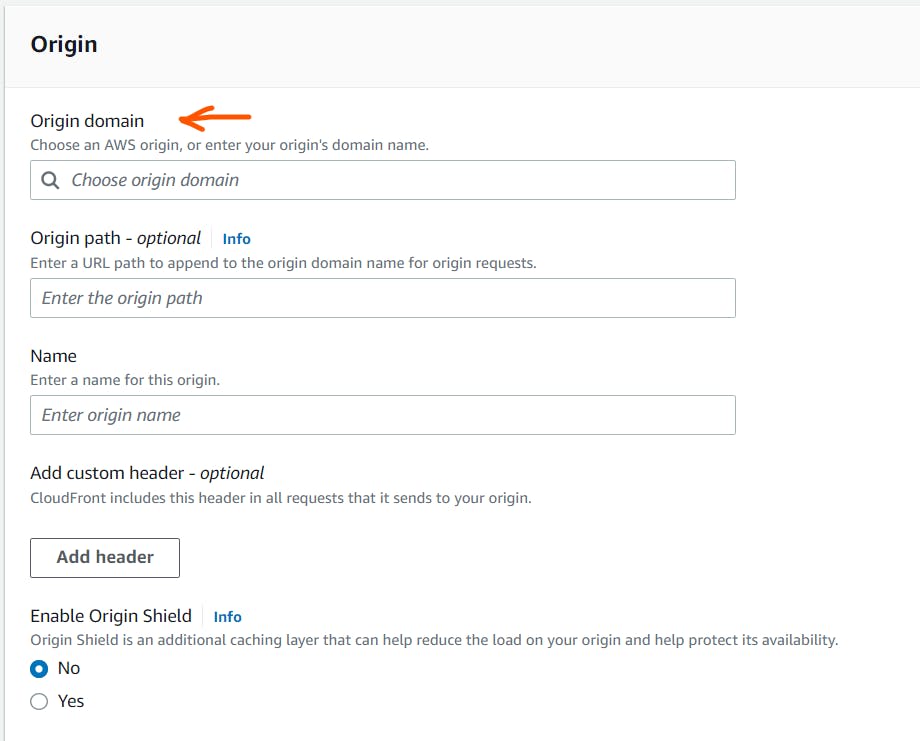
- In the r=Origin domain, paste the static website endpoint, usually of the format: bucketname.s3-website-region.amazonaws.com
- Other configurations are as below:
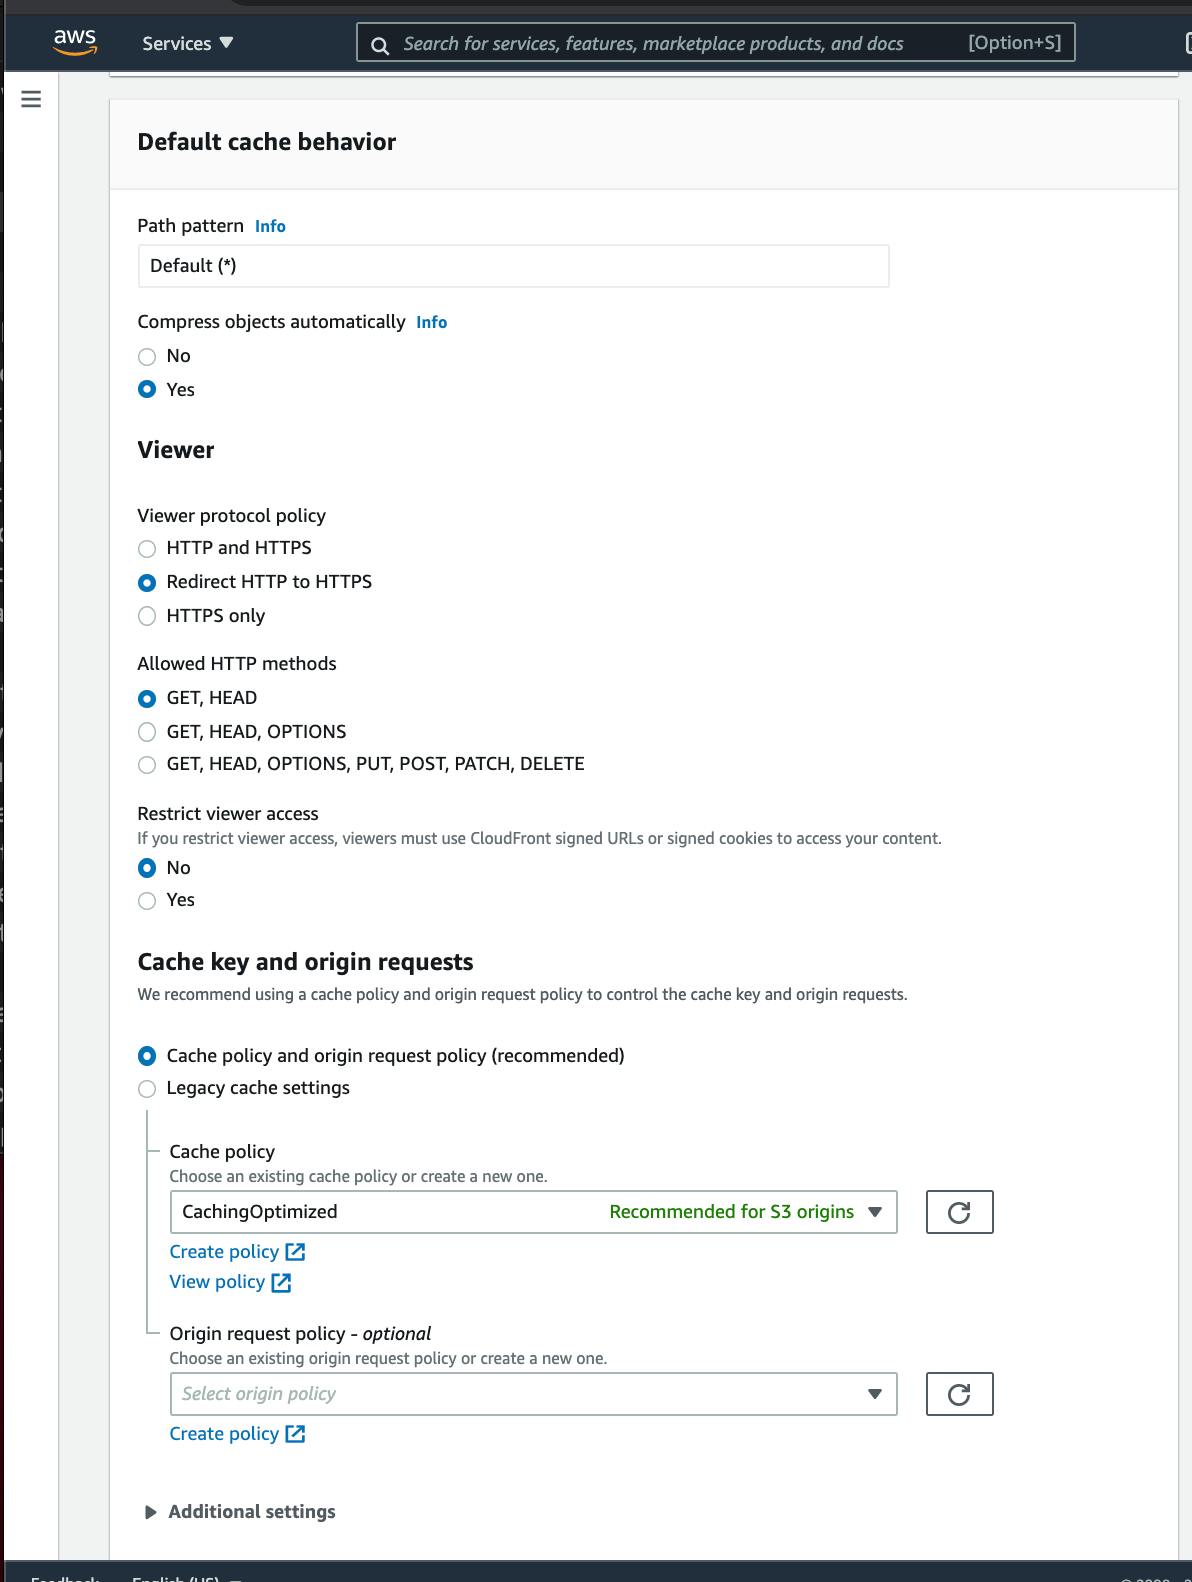 -Configurations - Cache behavior, key, and origin requests
Leave the defaults for the rest of the options, and click “Create Distribution”. It may take up to 10 minutes for the CloudFront Distribution to get created.
Once the status of your distribution changes from “In Progress” to “Deployed”, copy the endpoint URL for your CloudFront distribution found in the “Domain Name” column.
Note - Remember, as soon as your CloudFront distribution is deployed, it is attached to S3 and starts caching the S3 pages. CloudFront may take 10-30 minutes (or more) to cache the S3 page. Once the caching is complete, the CloudFront domain name URL will stop redirecting to the S3 object URL.

In this guide, the domain name is: d1hb1ibl9nbrl8.cloudfront.net. Yours might be different.
Access your Website
- Open a web browser, and paste the copied CloudFront domain name (such as d1hb1ibl9nbrl8.cloudfront.net) without appending /index.html at the end. The CloudFront domain name should show you the content of the default home-page, as shown below:
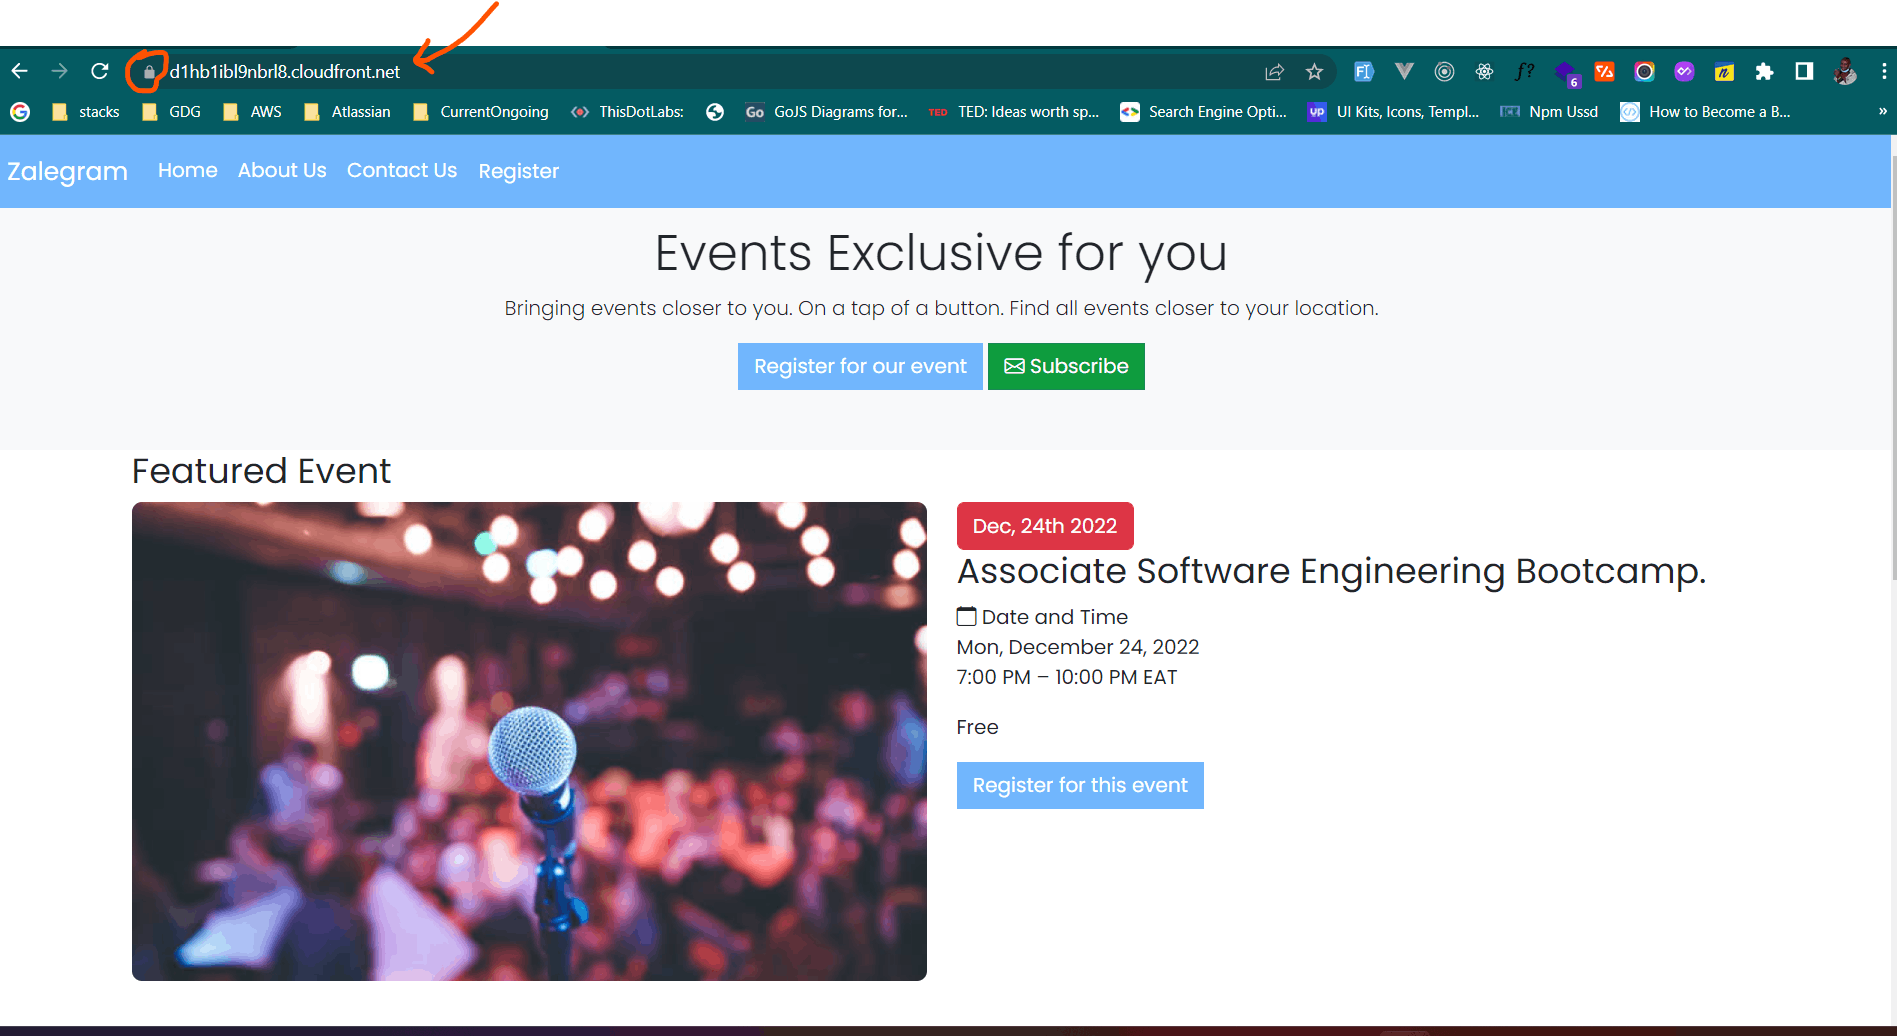
- All three links: CloudFront domain name link, S3 object URL, and website-endpoint will show you the same index.html content.
Conclusion
In this guide, we have learned how to host a static website on an Amazon s3 bucket and configure CloudFront distribution that offers lower latency and high speed of content access to the end users. We looked into how to upload files to your bucket using AWS Management console and CLI. We further looked at how to configure IAM by adding a policy explicitly to access the public bucket. We created a CloudFront distributed and pointed to the S3 bucket as the Origin. Finally, you can access the website on the browser using the unique endpoint generated by CloudFront.
Important Tips
- After completing the project instructions, and you still have trouble viewing the website contents, refer to the following guide: I’m using an S3 website endpoint as the origin of my CloudFront distribution. Why am I getting 403 Access Denied errors?.
When a user requests the URL that you're serving with CloudFront, the request is routed to the edge location that provides the lowest latency (time delay) so that website content is delivered with the best possible performance.
If the content is already in the edge location with the lowest latency, CloudFront delivers it immediately.
- If the content is not in that edge location, CloudFront retrieves it from an origin for our case S3 bucket.
END

